You can find us on the Mequon campus in Rinker 103 (near the library stairwell).
What are our hours?
We are open from 8:00 am to 10:00 pm Monday – Friday, and 8:00 am to noon on Saturday.
*If you are unable to stop by our office, but have an issue that needs to be resolved remotely, we can remote in through an application called Team Viewer. You can download it here: Get.teamviewer.com/cuwit
For more information, please see Download & Install TeamViewer for Remote Access in the Related Pages section.
1.2. Download & Install TeamViewer on Windows for Remote Access
2. After a few moments, TeamViewer will begin downloading on your computer. You will see it show up at the bottom-left of your screen.
3. Once finished, click on the file to open it. If it does not open automatically, navigate to your Downloads folder and double-click TeamViewer QS.
4. When the following window appears, check the EULA and DPA terms and conditions box and select I Agree.
5. On the disclaimer shown below, select Accept.
6. If TeamViewer does not open, you can find it in your Downloads or Documents folder. When open, provide the ID number and password to the IT staff member.
1.3. Download & Install TeamViewer on Mac for Remote Access
2. After a few moments, TeamViewer will begin downloading on your computer. You will see it show up at the bottom-left of your screen.
3. Once finished, click on the file to open it. If it does not open automatically, navigate to your Downloads folder and double-click TeamViewer Quick Support.
4. When the following window appears, select open.
5. Check the box next to I accept the EULA and the DPA. Select Continue.
6. On the disclaimer shown below, select Accept.
7. Depending on your Mac’s settings, you may have to enable your IT staff the ability to view your screen and control your computer. If the window below appears on your computer, select Request Access on the Screen Recording section.
If a window with an ID number and a password appear, skip to step 12.
8. Click on Open System Preferences.
9. In the Security and Privacy window, select Screen Recording, and select the lock icon at the bottom-left of the screen.
10. Either enter your computer account password or use the touch ID, if you have one. Select the
11. In the Security and Privacy window. Select the box next to TeamViewer Quick Support. Repeat steps 9 through 11 for Accessibility and Full Disk Access. Select Quit & Reopen to apply the settings.
12. If TeamViewer does not open, you can find it in your Downloads or Documents folder. When open, provide the ID number and password to the IT staff member.
2. Concordia Portal Login Information
2.1. New Student and Adjunct Concordia Account Setup
2. Enter your Concordia email in the empty field and select Next. Enter your Password and select Sign in.
3. You will be prompted to set up a Two-factor Authentication when you log in to your account. Read and click through the first three windows until you see the Select an option window shown in Step 4.
4. Select the Duo MobileThis is the Method recommended by the CUWAA IT Department. It is the easiest and most secure. If you do not have access to a smartphone, you can select the phone number option.
5. Enter your mobile phone number, select Add phone number, and then verify it is correct by selecting Yes, it’s correct.
6. You will be prompted to download Duo Mobile. Open the App Store on your phone and search for Duo Mobile." Select the Get or Install If the Duo Mobile app does not appear, it may not be compatible with your phone’s operating system. Please contact the help desk if this is the case.
7. Once installed, you may be asked if you would like Duo to send a notification. Select Allow. Select the "+" button in the top-right corner of the screen to capture the barcode from your computer.
8. After scanning the code, you will receive a notification informing you that you can now use Duo mobile to log in. Select Continue and select Skip for now.
9. You are now finished with DUO enrollment and ready to connect. Select Log in with DUO to continue with the account setup.
10. Follow the DUO prompt to verify your identity with DUO. On the following page select Next.
11. On this page, you will set up an authentication method for your Microsoft account so you can reset your password. Enter your phone number and click next, or select I want to set up a different method to choose a different authentication method.
12. If you would like a different authentication method, chose from the list below and select Confirm.
13. This is an example of the phone authentication method only. Follow the prompt on the screen to add the authentication method. Enter the code you received on your phone and press Next.
14. Once done, you will see the following windows. Select Next and thenselect Done to log in to your account.
2.2. Setup Authentication for Concordia Account Password Reset
2. Enter your Concordia email in the empty field and select Next. Enter your Password and select Sign in.
3. Follow the DUO prompt to verify your identity with DUO. On the following page select Next.
4. On this page, you will set up an authentication method for your Microsoft account so you can reset your password. Enter your phone number and click next, or select I want to set up a different method to choose a different authentication method.
5. If you would like a different authentication method, chose from the list below and select Confirm.
6. This is an example of the phone authentication method only. Follow the prompt on the screen to add the authentication method. Enter the code you received on your phone and press Next.
7. Once done, you will see the following windows. Select Next and thenselect Done to log in to your account.
2.3. Log into the Portal
1. In a web browser go to the Portal affiliated to the school you are attending.
2. Your username will differ depending on your position:
Student — Enter your F00 number in the Username field. Enter your password in the Password field.
*If you have not signed into the Portal before, you will need to use the Initial Password given to you in your IT Welcome Letter.
Faculty/Staff — Enter your 1st initial and last name in the Username field. Enter your password in the Password field.
3. Click Sign In. If you are given an error message saying "Login failed! Please recheck the username and password and try again" please try entering your credentials again with the following in mind:
When entering your F00 number (or student ID), make sure the "F00" part is made up of zeros rather than the letter "o."
Try typing the whole password rather than copying/pasting it.
Capitalization does not matter in the username field, but does in the password field.
If you still cannot log in try the following steps.
Try opening up a different browser, and logging onto the portal.
If your username and password are automatically saved on your browser, go into the browser settings and removed the saved credentials. Restart your browser and try logging in again.
Reset you password. Navigate to the Password Self-Serve page: O365 Password Change and select Reset Password. Enter your username and select the appropriate domain:
CUW – Faculty and Staff (Both CUW and CUAA)
CUWS – CUW Students
CUAA – CUAA Students
If none of the above steps work, please contact the IT Help-Desk at Support@cuw.edu or (262) 243-4357.
2.4. Navigating the CUWAA Portal
To access the portal, go to https://my.cuw.edu/ or https://my.cuaa.edu/, depending on your affiliated school. Below you will see instructions on how to view various tools in the Portal.
NOTE: The portal also has a search bar that can be used to search for anything on the portal.
Blackboard
On the dashboard select Student Links or Faculty Links, then select Blackboard Learn. You will be redirected to the Blackboard login page.
CUWAA Email
On the dashboard select Student Links, Employee Links, or Faculty Links then select Email. You will be redirected to the Microsoft login page to sign in.
Class Search
On the left of the webpage select the Course Registration tab. If you would like to look up a class select Browse Classes. You can also select Browse Course Catalog for more information on the courses or Register for Classes once you know which class you would like to register for.
Webprint (Papercut)
On the left of the webpage select the Technology tab and then select CUW Webprint. You will be redirected to the Webprint login page. Enter your Concordia username and password to log in.
1098T Form
On the left of the webpage select the Tools tab, and click on Banner Self-Service – Student.At the bottom of the menu, select Load More… until you see Tax Notification (1098-T) 9x.
Alternatively, enter 1098in the search bar at the top of the page to locate the forms.
Unofficial Transcripts
On the left of the webpage select the Tools tab and click on Banner Self-Service – Student. At the bottom of the menu, select Load More… until you see Unofficial Transcript.
Alternatively, enter Transcriptsin the search bar at the top of the page to locate the forms.
Make an Online Payment
On the dashboard select Student Links then select Pay your Bill Online. You will be redirected to the bill payment webpage.
2.5. Student and Adjunct Password Reset
Please Note: This will reset your password for your Single Sign-On (This includes your CUW email, Portal, and Blackboard login).
1. Go to my.cuw.edu/my.cuaa.edu and select the “Need help?” button below the regular Sign In boxes.
2. Click the link under “Change Your Password”
3. On the Microsoft Sign in page, enter your full CUWAA email address.
4. On the next page, enter your current CUWAA password. If you do not know your password, skip to step 7.
5. Enter your current password as well as what you would like to update the password to. You will have to enter the new password twice. Select Submit.
6. Next it asks you to log back into Microsoft’s site with your new password. You are welcome to do so, but it is not necessary.
7. If you don’t know your password: Select Forgot my password.
8. Enter your Concordia email in the top empty field and then fill in the bottom field with the characters that appear in the CAPTCHA (right above the second field). Select Next.
9. Select a verification method you previously set up with the account and follow the prompts to verify your identity.
10. Enter a new password twice and select Finish.
3. Email/Outlook
3.1. Set up Email on Outlook App (Recommended)
1. Download the Outlook app from the app store on your mobile device. Once downloaded, open the app and select Add Account.
2. Enter your Concordia email and select Continue. Enter your Portal login password and select Sign In.
3. Verify your Identity with the DUO push or text/call.
3.2. Email Setup in Outlook
1. Open the Outlook application on your computer. You can first try setting up your Concordia email through the automated process. If it does not work you can then try to set up your email manually.
2. Enter your Concordia email and press Connect.
3. Students will enter their CUW email. Faculty/Staff will enter their Concordia username followed by @cuw.edu. Enter your regular Concordia password and click OK.
4. Wait for Outlook to download your email. The automated process takes some time to connect – it often depends on your internet connection. If it does not work the first time please try connecting again.
5. If you still can’t connect, go back to the beginning window and follow the steps below:
Enter your Concordia email address, select Advanced Options, and check the box next to Let me set up my account manually. Click Continue.
6. It will ask you to enter some of the following information:
Server Type: Exchange
Server: outlook.office365.com
Domain: leave it blank
Username: Your Concordia email
Password: Your Portal Password
7. When the window below appears, click Allow.
8. Select your preferred preferences on this page and then click Next.
9. If your account was set up sucessfully the following window will appear.
3.3. Email Setup on Android
1. Click on Settings. Tap Accounts and Passwords and select Add Account.
2. Select Microsoft Exchange.
3. Enter Concordia email as well as your Portal Password. Tap Sign In.
4. If it fails to connect, keep the previously entered information. Under Domain\Username enter your CUW email after the backwards slash. Select Next.
5. Under Exchange Server enter outlook.office365.com. Select Next to sign in.
6. Select Activate. If asked, create a name for your new email.
3.4. Email Setup on iPhone and iPad
1. Go to Settings and select Mail and then Accounts.
2. Click on Add Account then select Microsoft Exchange.
3. Enter your Concordia email. You can also add a description if you would like. Click Next.
4. Select Sign In. If it does not automatically sign you in, go back to this page and select Configure manually.
5. Enter your email under Username and your Portal password for the Password field. Then enter outlook.office365.com in the Server field. Leave the Domain field blank. Select Next.
6. Select the apps you would like to sync with your email and select Save.
3.5. Email Setup on Windows 10
1. Press the Windows
button and enter Mail. Click on the Mail app.
2. Click Add
Account and Select Office 365.
3. Enter your CUW/CUAA
email and select Next.
4. Enter your username as well as your Portal
password.
5. Check Allow
my organization to manage my device and click OK. After a few seconds the will get a message saying you have
added your account successfully.
3.6. Email Setup on Mac OS
1. Open the Finder
and go to your Applications.Scroll down to Mail and double-clink on it.
2. Select Mail
at the top of the screen and click Add
Account.
3. Select Exchange and then hit Continue.
4. Enter your name as well as your Concordia email address. Select Sign In.
5. When the screen below shows up
select Sign In.
6. Enter your username as well as your Portal
password and click Sign In.
7. When the window below shows up click Accept.
8. Select what apps you want to use
with your Concordia email account and then select Done.
3.7. Forward Email from CUW Outlook Email to Personal Email
1. Sign in to my.cuw.edu with your F00 number and password.
2. After logging in, go to your email by selecting the envelope in the top
right hand corner of the screen.
3. At the top right hand or the screen, select the settings gear then
click View all Outlook settings at the bottom.
4. Select
Mail > Forwarding > Enable Forwarding > Enter your personal email
address.
5. After entering your personal email address, click save.
3.8. Turn off the Focused Inbox on Outlook 365 (Students)
1. Click the settings gear at the
top right of the page.
Turn off the switch next to
Focused Inbox.
3.9. Creating a Signature in Outlook Web App
1. Navigate to my.cuw.edu and log in with your
Concordia credentials.
2. Select the envelope icon at the top-right of
the Portal home page.
3. Select the gear icon at the top-right of the
page, and select View all Outlook Settings and the bottom of the
drop-down menu.
4. Under Settings, select Mail
and then Compose and Reply.
5. Enter your signature in the
blank field. You can edit the formatting with the icons above. Hit Save
when you are finished.
3.10. Edit Rules in the Outlook Web App
Please
note these instructions are for students who access their CUW/AA mail through
the Portal. Rules can be changed on
other platforms such as the Outlook Desktop App, but the steps to do so may
vary.
1. Sign in to the CUW/AA Portal, and select the
email icon at the top-right of the Portal Home page.
2. Select
the Gear icon at the top-right of the
Outlook Web App.
3. Select View
all Outlook settings in the drop-down menu.
4. Select Mail on the left side of the screen.
Select Rules just to the right of it.
5. Here you
can add, remove, and edit the existing rule you have created in your email.
3.11. What to do if your CUW/AA email has been Compromised
What to do if your CUW/AA Email has
been Compromised
Here are a
few signs that your CUW/AA email account may have been compromised:
You can no longer send or receive
emails.
Emails that have not been sent by you
are in your “Sent” folder
If you
noticed that your account may have been compromised, please follow the steps
below.
2. An IT Help-Desk
Tech will work with you to reset your password. Before resetting it, they will
ask you to provide the following information:
Your name
F00 number
An alternate email address
3. Once
verified, the IT Help-Desk Tech will provide you a new Initial password. You will be given directions to enroll in the
password recovery page, allowing you to create your password.
*You will
want to make sure the new password is as different as possible from your
previous password.
4. Log in to
the portal with your new password and open your Webmail app located at the
top-right corner of the Portal home page.
5. Go to
your Sent folder and delete any
messages that did not come from you.
*You can
select multiple emails by Shift + Left-clicking on an email, scrolling down,
and then Shift + Left-Clicking again on the bottom email. This will select
every email in between.
6. Select the
small gear icon at the top-right of the Outlook Web App. Click on View all
Outlook Settings
7. Highlight
Mail on the left and then select Rules. If there is a rule to move mail from
the Inbox to the Deleted Items folder, remove it.
8. Inform an
IT Help-Desk tech that you have completed the above steps. This will allow IT
to remove any Spam blocks that may have been set on your account.
3.12. How to Report a Phishing Email
If
you are reporting a phishing email on a personal computer follow the steps
below:
1. Log in to the CUW/AA portal at my.cuw.edu.
2. Select the small envelop icon at the top-right of
the Portal home-page.
3. Navigate to the email you suspect
is phishing and right-click on it. In the drop-down menu, hover your cursor
over Security Options and then select Phishing. This will report the email to
the IT department.
If
you have a University-issued computer follow the steps below:
1. Log into the Outlook application on your desktop.
2. Navigate to the
email you suspect is phishing and click on it. Under the Home ribbon, select Phish
Alert, all the way on the right side of the screen. This will remove the
email and report it to the IT department.
3.13. How to Recover Deleted Eail Messages in Outlook
Recover deleted email messages in Outlook
Office for businessOffice 365 Small BusinessMicrosoft 365 adminOutlook.comMore...
When you accidentally delete an email message in Outlook, you can recover the message if it's still in your Deleted Items folder. In some cases, you can even recover items after the Deleted Items folder is emptied.
You can also recover a deleted folder (with all of its messages) if it's still in your Deleted Items folder. Unfortunately, you can't recover a folder that's been permanently deleted. But you can use the steps in this topic to recover messages that were in a folder when it was permanently deleted.
Note: Sign into Outlook using your Microsoft 365 work or school account.
Note: If the instructions don't match what you see, you might be using an older version of Outlook on the web. See the instructions for Outlook Classic below.
Recover email that’s still in your Deleted Items or Junk Email folder
When you delete an email message, a contact, a calendar item, or a task, it's moved to the Deleted Items folder. If you don't see a message in the Deleted Items folder, check the Junk Email folder. Contents of deleted folders are only visible once you expand the Deleted Items folder.
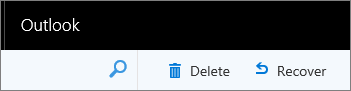
In the left pane, select the Deleted Items folder or the Junk Email folder.
Do one of the following:
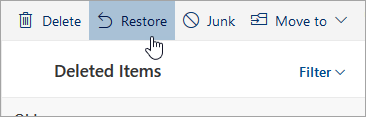
Deleted Items folder: Select the message you want to recover and select Restore.
Notes:
You can't restore messages that have been deleted from your Deleted Items folder.
Messages that were in a deleted folder can only be restored by selecting Move to and choosing a folder that's not been deleted.
For New Outlook for Windows, right-click the message you want to recover and select Restore.
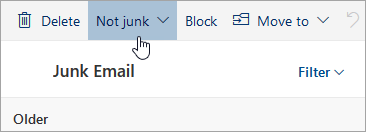
Junk Email folder: Select the message you want to recover and select Not junk.
For New Outlook for Windows, select the message you want to recover and select It's not junk.
Recover email that’s been removed from your Deleted Items folder
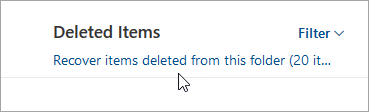
If you can't find an item in the Deleted Items folder, the next place to look is the Recoverable Items folder.
In the left pane, select the Deleted Items folder.
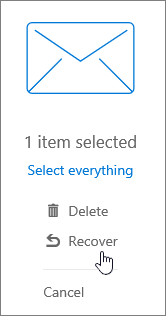
At the top of the message list, select Recover items deleted from this folder.
Select the items you want to recover and select Restore.
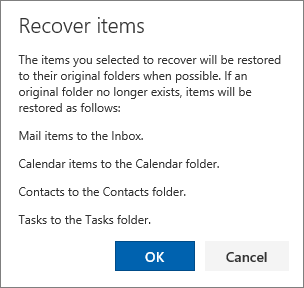
Where do recovered items go? The items you select to recover will be restored to their original folders when possible. If an original folder no longer exists, items will be restored as follows:
Messages go to your inbox.
Calendar items go to your calendar.
Contacts go to your contacts folder.
Tasks go to your tasks folder.
Stop Outlook from emptying your Deleted Items folder each time you sign out
Outlook may empty your Deleted Items folder each time you sign out. To change this:
At the top of the page, select Settings .
Select Mail > Message handling.
Under When signing out, uncheck the box next to Empty my deleted items folder.
Instructions for classic Outlook on the web
Recover email that’s in your Deleted Items folder
When you delete an email message, a contact, a calendar item, or a task, it's moved to the Deleted Items folder in your mailbox. If you're trying to find a message that was deleted, the Deleted Items folder is the first place to look. If the message is there, here's how to recover it:
In your email folder list, select Deleted Items and do one of the following:
To restore a message to its original folder, right-click the item and then select Recover.
To restore a message to a different folder, right-click the item, and select Move > Move to a different folder. Next, specify a folder location, and then select Move.
Tip: If you delete a folder, it's moved to the Deleted Items folder and appears as a subfolder. To recover it (and all the items it contains), right-click the deleted folder, click Move, and then select a folder to move it to.
Recover email that’s no longer in your Deleted Items folder
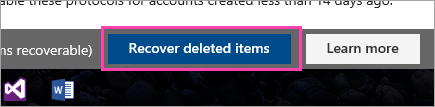
If you can't find an item in the Deleted Items folder, the next place to look is the Recoverable Items folder.
In the left pane of the Outlook on the web window, select the Deleted Items folder.
At the bottom of the window, select Recover deleted items.
Select the item you want to recover, and then select Recover from either the toolbar
or from the Reading pane.
In Recover items, select OK.
Where do recovered items go? The items you select to recover will be restored to their original folders when possible. If an original folder no longer exists, items will be restored as follows:
Messages go to your Inbox.
Calendar items go to your Calendar.
Contacts go to your Contacts folder.
Tasks go to your Tasks folder.
Note: You also can delete items that are shown in the Recover deleted items dialog box. Select the item, and then select Delete. If you delete an item, you can't use Recover deleted items to get it back.
Empty the Deleted Items folder when you sign out
When you delete a message, it’s first moved to the Deleted Items folder. You can let messages stay there until you remove them or you can set Outlook on the web to automatically empty your Deleted Items folder each time you sign out.
To empty the Deleted Items folder when you sign out:
Select Settings > Mail > Options, which opens the Options panel on the left.
Under Mail, select Message options.
Select the Empty the Deleted Items folder when I sign out check box, and then select Save.
3.14. Remove Senders from Junk Email
Mail goes to the Junk folder by mistake.
If email is going to your Outlook.com Junk folder by mistake, you can mark it as Not junk or add the sender to your Safe Senders list. Marking email as Not junk also helps us improve our service.
To mark an email message as Not junk in Outlook.com.
Open your Junk Email folder and select the messages you want to keep.
From the top toolbar, select Not junk > Not junk (or Not spam > Not spam). You can also open the message and select the It's not junk link at the top.
If you've blocked someone by mistake, open your Blocked senders list and select the next to their name.
To stop email from going to your Outlook.com Deleted Items by mistake.
Messages in your Junk folder are automatically deleted between 10 and 30 days after they arrive.
Check that the sender is not in your Blocked senders list. If they are, select the next to their name and add the sender to your Safe senders list instead.
Check that you don't have an Inbox Rule running for the sender or a keyword in the deleted email.
4. DUO Authentication
4.1. DUO Two-Factor Authentication Setup - Android
Duo Two-Factor Authentication Setup for Android
Navigate to your desired account and enter your credentials as you normally would.
This will prompt the Duo window to appear. Read and click through the first three windows until you see the “Select an option” window shown in step 3.
Select the “Duo Mobile” option. This is the Method recommended by the CUWAA IT Department. It is the easiest and most secure. If you do not have access to a smart phone, you can select the phone number option.
Enter your mobile phone number, select “Add phone number,” and the verify it is correct by selecting “Yes, its’s correct.”
You will be prompted to download Duo Mobile. Open the Google Play Store and search for "Duo Mobile." Select the "Install" button. If the Duo Mobile app does not appear, it may not be compatible with your phone’s operating system. Please contact the help desk if this is the case.
Once installed, select the "+" button in the top-right corner of the Duo app screen to capture the barcode from your computer.
After scanning the code, you will receive a notification informing you that you can now use Duo mobile to log in. Select “Continue” and select “Skip for now.”
You are now finished with enrollment and ready to connect.
4.2. DUO Two-Factor Authentication Setup - iPhone
Duo Two-Factor Authentication Setup for iPhone
Navigate to your desired account and enter your credentials as you normally would.
This will prompt the Duo window to appear. Read and click through the first three windows until you see the “Select an option” window shown in step 3.
Select the “Duo Mobile” option. This is the Method recommended by the CUWAA IT Department. It is the easiest and most secure. If you do not have access to a smart phone, you can select the phone number option.
Enter your mobile phone number, select “Add phone number,” and the verify it is correct by selecting “Yes, its’s correct.”
You will be prompted to download Duo Mobile. Open the App Store and search for "Duo Mobile." Select the "Get" button. If the Duo Mobile app does not appear, it may not be compatible with your phone’s operating system. Please contact the help desk if this is the case.
Once installed, you may be asked if you would like Duo to send notification. Select “allow.” Then select the "+" button in the top-right corner of the screen to capture the barcode from your computer.
7. After scanning the code, you will receive a notification informing you that you can now use Duo mobile to log in. Select “Continue” and select “Skip for now.”
You are now finished with enrollment and ready to connect.
4.3. Login With DUO Two-Factor Authentication
Duo Two-Factor Authentication Login Guide
Please note: your mobile device must be activated with Duo before you can follow this guide. If you have not done this yet, please see the Duo TFA Setup for Android or Duo TFA Setup for iPhone.
Duo will be needed to log in to the following:
SSO Logins (The Portal, Blackboard, etc.)
Office accounts (Outlook, OneDrive, Etc.)
Navigate to your desired account and enter your credentials as you normally would.
Once entered, a Duo window will appear on your screen prompting you to use a verification method you previously set up.
Check your mobile device for a push notification, text message, or call. Select Accept, or enter the code provided, depending on your verification method.
If you would like to use a different verification method than provide, select “Other options” and a new window will appear.
Below is a list and short description of each option.
Duo Push – Duo sends a notification to your mobile device. Select Accept on the prompt to verify your identity. - This is the method recommended by the CUWAA IT Department. It is the easiest and most secure.
Duo Mobile passcode – In the Duo mobile app, under your Concordia account, there will be a passcode. Type that in the empty field on your computer.
Text Message passcode – Duo will send you a text message. Enter the code provided into the empty field on your computer.
Phone Call – Duo will call your phone with an automated voice. Enter the code spoken into the empty field on your computer.
Bypass Code – If other methods of do not work, the IT department may be able to send a temporary code.
5. Wi-Fi Setup
5.1. FalconNet Setup on Windows 10
1. Select the Wi-Fi icon at the bottom-right of your screen. Choose FalconNet and click Connect.
2. Enter your Concordia email (or username for faculty/staff) as well as your Portal password and click OK. If the message below shows up, click Continue.
3. If it does not connect on step 2, right click on the Wi-Fi icon circled and choose Open Network and Sharing Center.
4. Select Set up a new connection or network.
5. Select Manually connect to a wireless network and then click Next.
6. Enter FalconNet into the Network name, and change Security type to WPA-2 Enterprise. Hit Next and try connecting to FalconNet a second time.
5.2. FalconNet Setup on Windows 11
1. Select the Wi-Fi icon at the bottom-right of your screen then click the arrow to show available networks. Choose FalconNet and clickConnect.
2. Enter your Concordia email (or username for faculty/staff) as well as your Portal password and click OK. If the message below shows up, click Continue.
3. If it does not connect on step 2, right-click on the Wi-Fi icon circled below and choose Network and Internet settings.
4. Select Wi-Fi and then Manage known networks.
5. SelectAdd network.
6. Enter FalconNet into the Network name, and change the security type to WPA-2 Enterprise.
7. Change the EAP methodto Protected EAP (PEAP).
8. Change the secured password to (EAP-MSCHAP v2).
9. HitSaveand try connecting to FalconNet again.
5.3. FalconNet Setup on Mac OS
1. Select the Wi-Fi icon on the top-right of your screen. Click on the FalconNet Network.
2. Enter your Concordia email (or username for faculty/staff) as well as your Portal password and click Join.
3. If the message below shows up, click Continue. If prompted, enter your computer password.
4. If it does not let you log in, go back to step 1 and select Join Other Network. Enter FalconNet as the Network and select WPA2 Enterprise as the Security type. Enter your Concordia email as the username well as your Portal password.Click Join.
5.4. FalconNet Setup on Android
1. On your phone, go to settings and select Connections.
2. Select FalconNet.
3. Enter the following information:
EPA Method: PEAP
Phase 2 Authentication: MSCHAPV2
CA/user Certification: Unspecified
4. Under Identity, enter your Concordia email (or username for faculty/staff). Enter your Portal password under password. Select Connect.
5.5. FalconNet Setup on iPhone
1.Go to settings and select Wi-Fi.
2. Select FalconNet.
3. Enter your Concordia email (or username for faculty/staff) in the username field and your portal password in the password field then select Join.
4. When the screen below appears, tap Trust.
5. If the connection does not work, go back to the Wi-Fi settings and select Other under Choose a Network.
6. Enter FalconNet as the Network and select WPA2 Enterprise as the Security type. Enter your Concordia email as the username well as your Portal password.Click Join.
5.6. FalconNet Setup on iPad
1. On your iPad, select Settings and go to Wi-Fi. Select FalconNet.
2. Enter your Concordia email (or username for Faculty/staff) as well as your Portal password and then select Join.
3. If the message below appears, click Trust. This should connect you to FalconNet.
4. If it does not let you log in, go back to the Wi-Fi settings in step one. Select Other and then Add Network. Enter FalconNet as the Network and select WPA2 Enterprise as the Security type. Enter your Concordia email as the username well as your Portal password.Click Join.
5.7. Residence Hall Device Setup Guide
There are several devices that can be set up to the internet on campus. Below you will see a list of different devices and how to get them set up.
Phones, Tablets, and Computers — See FalconNet Setup in the Related Pages section on this webpage.
Amazon Alexa, Echo Dot, and other speaker devices — Bring the device to the Help-Desk where it can be set up.
Roku, Apple TV, and other streaming devices — Bring the device to the Help-Desk where it can be set up.
Smart TVs — Set up a ticket with the Help-Desk to have a person come out to your residence hall. They will work with you to find a time to show up.
Game Consoles — These must be connected through an Ethernet cord and plugged in to the Ethernet port in your residence hall. The only exception is the Nintendo Switch — this can be brought to the Help-Desk to be set up.
You can reach the Help-Desk by phone: (262) 243 4357, email: support@cuw.edu, or in person. We are located in Rinker 103 (next to the the library stairwell).
6. Downloads and Discounts
6.1. Student & Faculty/Staff Software Discounts
Concordia students, faculty, and staff all have access to software discounts through Concordia.
The discount can be found at two locations:
1. OnTheHub offers various software discounts for students, faculty and staff. Your position will determine what types of discounts you are qualify for.
2. Students have access to additional computer discounts. Log in to the Portal and navigate to the Student tab. Scroll down until your find the Purchase PC Hardware and Software module shown below.
2. Click one of the Sign In buttons on the front page.
3. Enter your Concordia email and password in the following windows.
4. On the top-right corner of the new page, select Install Apps. A drop-down menu will appear. Select Microsoft 365 apps.
5. The following window will appear along with a notification that the Office Installer is being downloaded to your computer.
6. Double-click the download file to run the installer. Its location may vary depending on which browser you are using.
7. The following window will appear, indicating that Office 365 is being installed on your computer. Once it is done you will have access to all of the listed applications.
6.3. Download & Install Microsoft Project
1. Navigate
to the Portal at my.cuw.edu and log in with your username and password.
2. Log into
your CUW email by selecting the envelope icon at the top-right of the page.
3. Click on
your account button at the top-right of the screen. Then select View Account.
4. Select Office
Apps.
5. Select Apps
& Devices.
6.
In the Project box, select Install Project.
7. The following popups will appear. Select Save File to save the
Microsoft Project installer on your computer.
6.4. Create an Adobe Account (For Students)
1. Go
to the Adobe account page, and then click Create an account. You must click Create an account — do not use Google,
Facebook, or Apple.
2. On the Create an account screen,
provide the necessary information. Then click Create account. The email address you enter will be
your Adobe ID, so use a frequently used address that you’ll remember.
*
If
you do not use your CUW/AA email address your
license to use Adobe CC will not be applied and you will be restricted to a
trial.
3. You will receive an email from Adobe
with a link to verify your email address. You may have to wait for some time
before receiving the email. Once your account is created, click Continue
to access your account page.
6.5. Download Adobe CC Application (For Students)
1. Sign in to the
Creative Cloud website to begin downloading the Creative Cloud desktop
app.
2. Double-click the downloaded file to begin installation:
macOS: Creative_Cloud_Installer.dmg
Windows: Creative_Cloud_Set-Up.exe
*The download should
automatically detect whether you have a macOS or Windows computer and begin the
download you need.
3. After the download completes, navigate to where you
saved the file and double-click to start the installation.
4. Follow the onscreen instructions to complete your
installation.
*The Creative Cloud desktop app
always installs in the default location. You cannot specify a different folder
or drive.
7. Papercut and Printing
7.1. Link Falcon One Card to CUW Printer System
1. Scan your Falcon One Card on the card scanner, located on the printer.
2. If your card has not been associated with the system, you will get the message seen below. Enter your Concordia Single Sign-On username and password and tap Log In.
3. If successful, you will receive the following message indicating that the card has been linked.
4. Once linked, when you swipe your card on the card scanner the following screen will appear. The total of all the documents in your print queue will be listed. Select Print all to print all of the documents in the queue.
5. If you would prefer to only print select documents, tap the Print Release button and then select the desired files. Select Print.
7.2. Print Credit Cost
Size
Color
Grayscale
ColorDuplex
GrayscaleDuplex
Letter (ANSI_A)
$0.1200
$0.0400
$0.1200
$0.0400
Legal (LEGAL-14)
$0.1200
$0.0400
$0.1200
$0.0400
11X17 (LEDGER)
$0.1200
$0.0400
$0.1200
$0.0400
Default (Other Sizes)
$0.1200
$0.0400
$0.1200
$0.0400
*Print credits can be bought at the Cashier's office. Once they have been added to your account, you will receive an email from the IT department.
7.3. Upload and Print in Webprint (Papercut)
1. Navigate to the Web Print login page at: http://cuwprint01.cuw.edu:9191/user and enter your Username (F00 Number) and password. Select Login.
2. Select Web Print on the left side of the new page.
3. Select Submit a Job.
4. Select your desired formatting for the print job. This will influence whether the page is printed in black and white (BW) or color, as well as single-sided or double-sided (DS). To continue, select Print Options and Account Selection.
5. Enter the number of copies you would like to print and select Upload Documents.
6. Select Upload from Computer to search for the documents you want to print or drag and drop the files into the dotted section of the page. To continue, select Upload and Complete.
7. You will see the status of your document on the next page. After a few moments, the status should change to held in a queue. If there is a lot of traffic it may take a few minutes.
8. Locate the nearest printer on campus. Swipe your Falcon One card or enter your Single Sign-On credentials to log in. Select the desired files and then select Print.
7.4. Scan and Send Document to Yourself
1. Scan your ID card on the printer.
2. Press the Scan
3. Press the Scan to My Email
4. You will then be taken to the screen below. You can change the subject of the email by clicking on the box below Subject and entering the desired subject of the email. Similarly, you can change the filename of the scanned document by clicking the box below Filename.
5. If you wish to change the settings on the scan, such as scanning in color or landscape mode, press the Change Settings button and select your desired settings.
The currently selected settings will be lighter and have a green bar underneath. To change a setting, click on the option you wish to change the setting to. It will then turn white and get a green bar underneath.
6. Before pressings start, we want to make sure our paper is ready to be scanned. To scan your paper, you have two options:
a. Using the tray on the top of the printer: Place your paper with the top feeding in first and the contents you want to scan facing you, as seen in the image below.
b. Using the scanning bed: Place your paper face-down on the glass with the top and right edges flush with the edge of the bed, as shown in the image below.
7. Once your desired settings have been chosen, press the Start button to begin scanning.
8. If you wish to add another page to your fax, repeat step 8 and then press the Scan Next page If you have scanned all the pages you need, press the Finish button.
9. You will receive an email with your scanned document.
7.5. Scan and Send a Document to Others
1. Scan your ID card on the printer.
2. Press the Access Device button.
3. You will be greeted by this screen. Press Scan and Send.
4. You will then arrive on this screen. Here you can choose the recipients of your scan. To search, you can press the Search by Conditions button or the Search by Name If using Search by Name, please note that names are ordered by last name and then first name.
5. Once you have selected the recipients of your scan, press OK.
6. You will then be greeted by this screen. If you wish to change any of the settings on the scan, press the options button and select the appropriate settings.
7. Before starting the scan, make sure the paper is ready to be scanned. To scan your paper, you have two options:
a. Using the tray on the top of the printer: Place your paper with the top feeding in first and the contents you want to scan facing you, as seen in the image below.
b. Using the scanning bed: Place your paper face-down on the glass with the top and right edges flush with the edge of the bed, as shown in the image below.
8. Once you are ready to send the scan, press the green Start button.
9. Once the printer has scanned the page, it will email it to the specified recipients and the screen will show the address book. If you wish to send another page, repeat step 4.
7.6. Send a Fax through a Printer
Send a Fax from the Printer
1. Scan your ID card on the printer.
2. Press the Scan button.
3. Press the Fax Button.
4. You will then be taken to the screen below. Press the + button in the lower-left corner.
5. On this page, you can click on the box below “Fax number” and a keyboard will appear on the screen. Use this to enter the number you are sending a fax to.
6. Once you have entered the number, press “Okay” on the keyboard. The screen should then look something like this.
7. You can then press the “Add Recipient” button. If you wish to add more recipients, repeat steps 4-6.
8. If you wish to change the settings on the fax, such as sending the fax in color or landscape mode, press the “Change settings” button and select your desired settings.
8a. The currently selected settings will be lighter and have a green bar underneath. To change a setting, click on the option you wish to change the setting to. It will then turn white and get a green bar underneath.
9. Before pressings start, we want to make sure our paper is ready to be scanned. To scan your paper, you have two options:
a. Using the tray on the top of the printer. Place your paper with the top feeding in first and the contents you want to scan facing you, as seen in the image below.
b. Using the scanning bed. Place your paper face-down on the glass with the top and right edges flush with the edge of the bed, as shown in the image below.
10. Once your desired settings have been chosen, press the “Start” button to begin scanning.
11. If you wish to add another page to your fax, repeat step 8 and then press the “Scan next page” button. If you have scanned all the pages you need, press the “Finish” button.
12. Once your fax has been sent, you will receive two emails, one stating that your document has been sent to the fax provider, and a receipt containing your fax and a receipt stating that it has been sent. Screenshots of the two can be seen below.
7.7. Windows 11 - Change the Default Printer
Click the Start button and then type “Run”
An alternate method for opening the Run program is to press WIN+R on your keyboard.
In the Run popup, copy and paste the following shell command:
shell:::{A8A91A66-3A7D-4424-8D24-04E180695C7A}
Click OK
In the window that pops up, right-click the printer that the user would like to be their default
Click “Set as default printer.”
You may see the following box pop up. If it does, click OK.
Once clicked, the printer icon will now have a green checkmark.
Repeat this process if the user needs to change the default printer in the future.
8. Falcon One Card
8.1. What to do when your Falcon One card is not working
1. Test your card on several doors, not only the
one your card does not work on.
2. Bring your card to the Help-Desk located in
Rinker 103.
3. We will test your card to determine if the card
needs to be replaced or if it simply needs to be granted swipe access.
4. Depending on the availability of our staff, we
may set up a ticket for your request and look into your account as soon as we
are available.
*If you need immediate access to a room on campus,
please contact Campus Safety at (262) 243-4344. They may be able to assist you.
8.2. Uploading Your Concordia ID Picture Online
Photo Submission Instructions
Please note: You will NOT receive a physical Falcon OneCard if you only submit a photo online. Click herefor more information on how to obtain your Falcon Onecard.
Guidelines for your ID picture:
The photo must:
Be in color with normal contrast and lighting (no filters)
Be recent (within 6 months) with only one person in the photo
Include a natural or neutral expression/smile
Have the head and chin facing forward, looking straight into the camera
Have the face and eyes clearly visible, without a shadow
Be cropped to show the top of shoulders and full head.
Have a background that is solid grey, tan, white, or similar color (NOT black or fluorescent and NO patterns, creases, corners or wildlife/nature)
NOT have a hat, scarf, costume or sunglasses (exceptions may be made for religious purposes)
NOT have red eye or a glare in the eyes and/or glasses
Minimum px requirement is 700x933 px
Please upload a high-quality picture (in landscape) that shows head and shoulders with a plain neutral background. The program will ask you to crop the photo to the required aspects. We need to be able to see your face and eyes clearly. Glasses are ok, but no sunglasses. Pictures that don't meet the standards will be rejected. Thank you for your cooperation!
Want to use a photo but it doesn’t have a plain background?
Find the site under the Student tab on the portal:
3. Login with your Student ID# and password.
4. Next click on the Menu (three lines), and then Account, and then Upload Photo.
5. Finally, click on the Upload button to select your picture.
6. After it shows your photo, click Crop and Rotate to crop it down to head and
7. When you are finished, click Submit.
8. Wait for an email approving or rejecting the submitted photo. After approved, photo will appear on the account.
If you have trouble, please email support@cuw.edufor assistance.
Frequently Asked Questions:
Why can’t I see my picture after I submitted it?
We manually check each picture to make sure that they are appropriate for your ID. This process can take up to 2 business days. You should receive an email approving or rejecting the picture you submitted. If your photo was approved, then you should see it in your OneCard account. If it was rejected or still pending, then the picture will not appear in your account.
I keep getting an error message saying that my photo does not match the ratios. What does that mean?
This system was designed for landscape photos taken by a smartphone. Some photos taken by a professional photographer (like senior photos) may not fit the standards that we require. Pictures must meet our ratio requirements.
How will I know if my picture was approved or rejected?
You will receive an email to your CUW email account with a message stating
whether it was approved or rejected after it has been processed. If it was rejected, there will be a reason listed.
Will I have to upload a new photo next year?
No.
My face looks distorted in the upload, is that how it will look on my ID?
If your picture uploads weirdly, we will reject the photo and you can try resubmitting it. We won’t approve a photo that is distorted. When resubmitting, try using a landscape photo per the instructions to prevent distortion. If the photo looks distorted after it is approved, email onecard.office@cuw.edu.
How do I get my ID card?
Please visit the Falcon OneCard webpageon the CUW website to get more information on obtaining your ID card.
2. Enter your Concordia email address. Select Next. You will be redirected to the Concordia University SSO (Single-Sign-On) page. Enter your credentials and select Sign In.
3. The following window will appear. Selecting Yes will retain your credentials longer, resulting in fewer logins (this is less secure). Selecting No will require more logins but is much more secure.
4. You are now logged into OneDrive.
9.2. Share Files in Microsoft OneDrive
1. In any Internet browser navigate to https://onedrive.live.com/about/en-us/signin/. Enter your CUW/CUAA email address and then click next. Ener your password to finish signing in.
2. The following message might appear after signing in. Select either Yes or No to continue. Selecting No is the more secure option.
3. On your OneDrive page, click “+ Add New” and then select the document type you want to create. For the purpose of this tutorial we’ll use a Word Document
4. Name and add content to your document and then click the blue Share button at the top right-hand corner of the screen. It will then bring down a small menu. Select Share from the new menu.
5. To share an already existing document you can select the icon shown below in web portal. The Icon will appear next to the name of the file.
6. A new menu will appear. In the first section add the group or individual people you want to share this document with. The second section will add a message to the email that is sent with the link to the document.
7. For Sharing option click on the text “People in your organization with the link can view.” A new menu will appear with the following permission options.
People in Concordia University Wisconsin with the link: Only CUWAA users that you send the link to will have the permissions that you set
People with existing access: This option will resend the link to anyone who already has access.
Specific People: Email addresses you specify will have the permissions that you set.
Please Note that you will not be able to share OneDrive documents with people who are outside of Concordia.
Under “More setting” the first option will allow you to set who can make edits or request edits to the document
Can Edit: Make any changes
Can Review: Can only suggest changes
Can View: Can’t make changes
Block download: Prevent users from downloading a copy of the document
8. To save the sharing permission that your have selected click “Apply”. It will then bring you back to the previous menu.
9. Once you have selected your share permissions and added the users to share with click Send (optionally you can select "Copy Link"). It will then display a message showing that a link to the document has been sent.
10. Zoom
10.1. Download, Install, and Log in to Zoom
If you would like a video guide to downloading, installing and login into Zoom Click Here.
2. In the Download Center click on Download, under Zoom Desktop Client.
3. The Zoom installer file will appear in one of the following places: at the bottom left of your computer screen, at the top right, or in your Downloads folder.
4. Click on the Zoom Installer to install it. It will take a few moments to finish installing. Once done, the Zoom app will appear on the sign-in screen.
5. Select Sign In.
6. Select the SSO sign-in option, enter CUWAA, and then select Continue.
7. Enter your Single Sign-On username and password and select Login. You will then be logged in to Zoom.
10.2. Update Zoom
1. Select your profile picture at the top right of the Zoom window and click Check for Updates.
2. If there is an update available, Zoom will begin to download that update.
3. Once the update is finished downloading, click the Update button to install the update.
4. A dialogue box may after clicking Update. It should not need any input from you.
Note: At the top of the Zoom window, you may occasionally see a message that says A new version is available. Select Update to begin the process shown above.
11. Miscellaneous Guides
11.1. Concordia Transcripts
The process will vary slightly depending on if you are looking for an official or unofficial copy of your academic transcript.
Official Transcripts: Click here and then select the National Student Clearing House link to request an official transcript.
Unofficial Transcripts: Log into the Portal and click on the Student tab. Scroll down to the the Academic Advising channel select Unofficial Transcript. Then fill in the correct filter options.
*Please note you must be currently enrolled in a class to have access to view your unofficial transcripts.
If you have any questions regarding Academic Transcripts please contact the Registrar's Office at (262) 243-4345 or at registrar@cuw.edu.
2. Type the phrase Snip and Sketch (A search box will appear as you type) and click on it.
3. In the window that opens, click New in the upper right to take a screenshot of any part of your screen.
4. After grabbing your screenshot, you will be able to mark it up, save it, copy it, or share it from within the program using the toolbar at the top of the screen.
5. You can pin Snip and Sketch to your Windows taskbar for later use. Find the icon in your taskbar while the program is open and right-click. Then select the Pin to taskbar option.
11.5. Clear Cache & Cookies on Internet Browsers
PLEASE NOTE: For most browsers, you can press and hold the Shift, Ctrl, and the Delete keys to bring up the data clear page.
Google Chrome
Open Google Chrome.
Click the 3 dots in the upper right corner.
Under more tools, click Clear Browsing Data.
Make sure the time range is all time.
Check both Cookies and Cached Images and Files.
Click Clear Data.
Restart your browser.
Firefox
Open Firefox.
Click the 3 horizontal lines in the upper right corner.
Select Options, then Privacy & Security.
Under Cookies and Site Data, click on Clear Data.
Make sure both Cookies and Cached Web Content are checked.
Click Clear.
Restart your browser.
Safari
Open Safari and select Settings.
Select Privacy and then click Manage Website Data.
Click on Remove All and then Remove Now.
Go back to the Preferences window and select Advanced.
Check the box next to Show Features for Web Developers to show Develop in menu bar.
Select Develop at the top of the screen and select Empty Caches.
Restart your browser.
Edge
Open Edge.
Click on the three dots in the upper right corner.
Select Settings and then click on Choose what to clear.
Select the boxes next to Browsing history, Cookies, Cached Data, and Download History.
Select Clear.
Restart your browser.
Internet Explorer
Select the gear icon at the top-right of the page.
Click Safety and then choose Delete Browsing History.
Uncheck Preserve Favorite Website Data.
Check Temporary Internet Files and Cookies and click Delete.
Restart your browser.
11.6. Compress Images in PowerPoint (so it can be sent through Email)
1. Select File.
2. Select Save As. Choose a location to save the file.
3. Enter the name you would like to call the file. Select Tools, and then in the drop-down menu select Compress pictures.
4. Check Delete cropped areas of pictures. Select Email as the target output. Click Ok. Save the file.

 > Mail > Options, which opens the Options panel on the left.
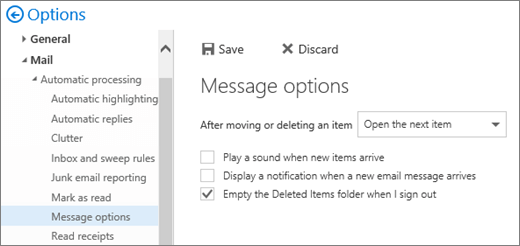
 next to their name.